
24 Jan 2025
Ah, graphics programming. For many, OpenGL has been the first step into this world. OpenGL is an easy to use, widely supported graphics API with decades of resources. However, modern demands in rendering have pushed OpenGL to its limits and Vulkan became a successor that offered more control. Maybe you’re here after just learning the basics of graphics programming with OpenGL and now want to give Vulkan a try or maybe you’re brave enough to step into graphics programming with Vulkan straight away. In this post, I’ll be talking about the basics of vulkan and the differences between it and OpenGL.
I started off with an engine that already had the basic structure for the renderer in place. The goal was to replace the OpenGL implementation with a Vulkan implementation. The OpenGL renderer I’m starting with has some basic features like: a GLFW window, instancing, PBR materials, lights (directional and point), shadow maps (only for directional lights), MSAA, and effects like fog and a vignette.
Even with libraries like vk-bootstrap to simplify setting up Vulkan it still requires a lot more setup than OpenGL. For instance you will need an instance, a physical device, a logical device, a swapchain, command pools, command buffers, and more. The instance is the entry point into Vulkan and does not need much configuring. Then you will need to find a physical device, this is your GPU. You can query for the device properties to select a GPU. Now that you have the physical device you need to create a logical device. The logical device specifies more specific information about what features you want to be using.
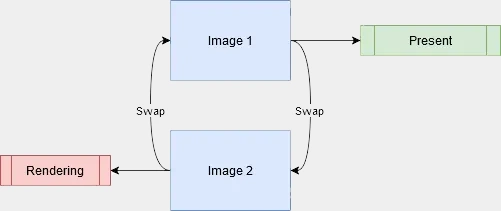
Now you will need a swap chain. The swap chain is basically a queue of images. While you might think that you would only need one image to render to and display, this would result in visible issues like screen tearing and stutters. We need to render to an image while we present another image. This is called ‘double buffering’ (or ‘triple buffering’, depending on the number of images) and is managed by the swap chain. You acquire an image from the swap chain, render to it, then hand it back for it to be presented.
Now you have the option to either use frame buffers and render passes or the dynamic rendering extension, which simplifies the API around rendering. I went with dynamic rendering. If you still want to use frame buffers and render passes I recommend reading the chapter about frame buffers in the Vulkan tutorial.
Next up is pipelines. More specifically graphics pipelines. It describes how Vulkan will render. For example the resolution it will render at but more importantly the shaders it will use. All of this needs to be configured before hand so you will most likely need multiple pipelines to render different types of objects.
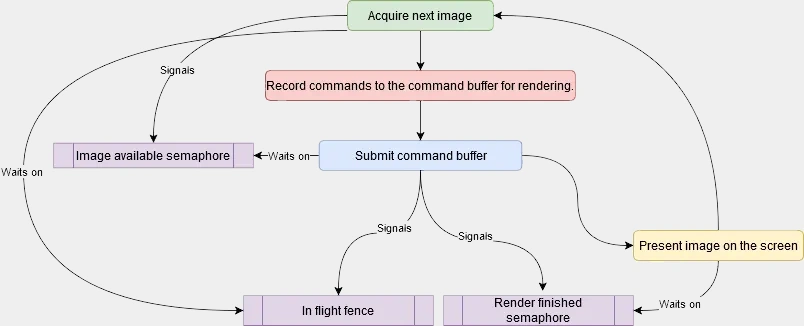
Something I didn’t mention earlier is that with the logical device you need to specify which queue families you would like to use. Queue families describe how a set of queues have similar purposes. Examples are: a graphics queue, compute queue, transfer queue, present queue. Vulkan talks to the GPU via commands. These commands need queues because Vulkan often performs operations in parallel. These commands are recorded to a command buffer which is created by a command pool which specifies what queue family it is. Then when you’re done recording the commands you submit it and let the GPU execute the commands. Once its finished it is presented to the screen.
Now for the actual rendering. After the command buffer begins recording you can start sending commands. First we will need to begin either the render pass or rendering depending on if you’re using dynamic rendering. I am using dynamic rendering so for me its begin rendering. This is where you specify what image you will render to, the load and store operations, the clear value, and the attachments. Now you can set the viewport and the scissor. A viewport defines the area of the image that will be rendered to. The scissor is the area of the image that is actually stored. In most cases this will be from (0, 0) to (screenWidth, screenHeight). Now you can bind the graphics pipeline, vertex buffer and index buffer and send a draw command to render. A rendering loop would look something like this:
// wait for fences
// reset fences
// acquire next image
// reset command buffer
if (vkBeginCommandBuffer(commandBuffer, &commandBufferBeginInfo) != VK_SUCCESS)
{
    Log::Critical("Failed to begin recording command buffer");
}

// colorAttachment
// depthStencilAttachment

VkRenderingInfoKHR renderingInfo{};
renderingInfo.sType = VK_STRUCTURE_TYPE_RENDERING_INFO_KHR;
renderingInfo.renderArea = VkRect2D{{0, 0}, {m_screenWidth, m_screenHeight}};
renderingInfo.layerCount = 1;
renderingInfo.colorAttachmentCount = 1;
renderingInfo.pColorAttachments = &colorAttachment;
renderingInfo.pDepthAttachment = &depthStencilAttachment;

vkCmdBeginRendering(commandBuffer, &renderingInfo);

// Set viewport and scissor

vkCmdBindPipeline(commandBuffer, VK_PIPELINE_BIND_POINT_GRAPHICS, m_pipeline);
vkCmdBindDescriptorSets(commandBuffer,
                        VK_PIPELINE_BIND_POINT_GRAPHICS,
                        m_pipelineLayout,
                        0,
                        1,
                        &m_descriptorSet,
                        0,
                        nullptr);

PushConstant constant;
constant.pv = projection * view;
vkCmdPushConstants(commandBuffer,
                   m_pipelineLayout,
                   m_pushConstantStages,
                   0,
                   sizeof(PushConstant),
                   &constant);

VkDeviceSize offset = 0;
vkCmdBindVertexBuffers(commandBuffer, 0, 1, m_vertexBuffer, &offset);
vkCmdBindIndexBuffer(commandBuffer, m_indexBuffer, 0, VK_INDEX_TYPE_UINT32);

vkCmdDrawIndexed(commandBuffer, m_indexCount, 1, 0, 0, 0);

if (vkEndCommandBuffer(commandBuffer) != VK_SUCCESS)
{
    Log::Critical("Failed to end recording command buffer");
}
// submit
// wait on render finished
// present
Sending over information to the shader like the transforms of the camera and the objects being rendered works a little bit differently than in OpenGL. In Vulkan there are descriptors. A descriptor allows the shader to access GPU resources (i.e. buffers, images, samplers, etc.). To use descriptors, they must be grouped into a descriptor set. Descriptor sets are allocated from a descriptor pool, which manages their memory and lifetime. Each descriptor set has a descriptor set layout which is given to the graphics pipeline. The layout describes the slots and the types of the descriptors inside the set. To use a descriptor set, it needs to be bound before drawing just like you bind a vertex buffer. Vulkan supports the same UBOs and SSBOs you’re familiar with from OpenGL. New to Vulkan are push constants. Push constants are a small bit of data (minimum 128 bytes, implementation defined) that can be sent to the shader without buffers or descriptors. They are useful for sending small per object data like a transform matrix.
Where in OpenGL you can update a uniform at any point, in Vulkan you first need to setup a descriptor set. One of the problems I ran into was that descriptor sets can not be updated anymore after they’re bound during a frame. So when I was looping over my meshes to render them I tried to update the descriptor sets for each object. This resulted in it only working for the first object and a crap ton of validation layer errors telling me that the bound descriptor set has either been updated or destroyed. To solve this I uploaded all the object data to the GPU before the rendering through a descriptor set with a storage buffer, then used a push constant to pass the object’s index to the shader.
// simplified code
vkCmdBindPipeline();

PushConstant constant;
constant.pv = projection * view;
vkCmdPushConstants();

for ( const auto& mesh : meshes )
{
  UpdateTransformBuffer(mesh);
  vkUpdateDescriptorSets(); // Would only work for the first mesh

  vkCmdBindDescriptorSets(); // Binds descriptor set

  vkCmdBindVertexBuffers();
  vkCmdBindIndexBuffer();

  vkCmdDrawIndexed();
}
I mentioned validation layers just now. You might be wondering what those are. In OpenGL, error checking is done by the driver, which can lead to overhead and doesn’t give the developer control over when and how errors are checked. Vulkan makes developers manage error checking themselves. Vulkan gives you validation layers. They are layers that go between Vulkan function calls to check for errors. This means by default Vulkan has no error checking which reduces driver overhead.
The coordinate system also differs. In OpenGL, (0,0) is at the bottom left with Y pointing up, and depth ranges from -1 to 1. Vulkan differs: (0,0) is at the top left, Y points down, and depth ranges from 0 to 1.
In OpenGL textures are mostly abstracted away. You call glTexImage2D and most of the memory allocations, format conversions, and bindings are done for you. In Vulkan you need to handle all of this yourself. First you need create an image, where you specify the format, size, and usage. You also need to allocate memory for this image. You can do this normally or using a library like Vulkan Memory Allocator (VMA). VMA abstracts complex parts of Vulkan’s memory management.
// Without VMA
VkBufferCreateInfo bufferCreateInfo = {};
bufferCreateInfo.sType = VK_STRUCTURE_TYPE_BUFFER_CREATE_INFO;
bufferCreateInfo.size = size;
bufferCreateInfo.usage = usage; // e.g. VK_BUFFER_USAGE_VERTEX_BUFFER_BIT
bufferCreateInfo.sharingMode = VK_SHARING_MODE_EXCLUSIVE; // Used by a single queue

vkCreateBuffer(device, &bufferCreateInfo, nullptr, buffer);

VkMemoryRequirements memRequirements;
vkGetBufferMemoryRequirements(device, *buffer, &memRequirements);

VkMemoryAllocateInfo allocInfo = {};
allocInfo.sType = VK_STRUCTURE_TYPE_MEMORY_ALLOCATE_INFO;
allocInfo.allocationSize = memRequirements.size;
allocInfo.memoryTypeIndex = findMemoryType(memRequirements.memoryTypeBits, properties); // Custom function

vkAllocateMemory(device, &allocInfo, nullptr, bufferMemory);

// With VMA
VkBufferCreateInfo bufferCreateInfo = {};
bufferCreateInfo.sType = VK_STRUCTURE_TYPE_BUFFER_CREATE_INFO;
bufferCreateInfo.size = size;
bufferCreateInfo.usage = usage; // e.g. VK_BUFFER_USAGE_VERTEX_BUFFER_BIT
bufferCreateInfo.sharingMode = VK_SHARING_MODE_EXCLUSIVE; // Used by a single queue

VmaAllocationCreateInfo allocCreateInfo = {};
allocCreateInfo.usage = memoryUsage; // e.g. VMA_MEMORY_USAGE_GPU_ONLY

vmaCreateBuffer(allocator, &bufferCreateInfo, &allocCreateInfo, buffer, allocation, nullptr);
In OpenGL, textures bundle together the sampler parameters (filtering, wrapping) and the texture itself, with no separation between the object and its view. Vulkan splits these into three distinct objects: the image, the image view (which specifies mip levels, layers, format interpretation), and the sampler.
Vulkan also requires you to manage image layout transitions manually. When OpenGL moves a texture from render target to shader input it handles the transition automatically. In Vulkan you do this explicitly with pipeline barriers.
Finally, rather than binding textures at draw time like OpenGL, you will need to define all the images the shader will use in advance with descriptor sets.
Although Vulkan is undoubtedly more complex than OpenGL, I believe that Vulkan is currently the best option for a cross-platform rendering API. Its main competitors, DirectX and Metal, only work on their own platforms (Windows/Xbox for DirectX, Apple platforms for Metal). Meanwhile, Vulkan runs on Windows, Linux and Android (also on Apple platforms if you count MoltenVK). If you already know some graphics programming/OpenGL, learning Vulkan should not be too difficult. If you still have an OpenGL renderer lying around I recommend trying to learn Vulkan by replacing it with a Vulkan one. While OpenGL will always be a great starting point for graphics programming, Vulkan offers more control and efficiency.